The machine can sift through sand to find what it wants.

Search
The machine can sift through sand to find what it wants.
過年知道大家都好想我較蒸糕,今次教大家椰汁年糕,我依個版本同傳統有小小唔同, 想知點整就記得睇了,記得交功課呀😁
高清版:https://youtu.be/9EWgIo9y6MQ
椰汁年糕
材料:
📌糯米粉225克
📌沾米粉37克
📌澄麵30克
📌片糖200克大约2片多小小(要弄碎些比较容易煮得溶)
📌水210克
📌椰奶120毫升
📌oil 30克
📌錫纸盆掃上油
📌鍚紙一張
📌紅棗一粒
做法:
1. 先用小火在210g 水中煮溶所有
片糖後, 待涼
2. 將三種麵粉全部一起過篩, 並可
混合在一起備用
3. 將(1)的糖水過篩, 如未涼攪幾下
来降温後才加入椰奶
4. 將(2)的麵粉中間整個洞, 將糖水
分多次慢慢加入及每次攪匀了再
加入另一次
5. 加油入粉漿内可用手動打蛋器或
攪拌機攪至粉漿平滑直至没有粉
粒
6. 讓攪匀的粉漿静止20分鐘(可以
幫助麵粉吸入水份)
7. 將粉漿再次撹匀,然後再過篩倒
入蒸盆, 蓋上錫紙
8. 用蒸爐100度蒸1至1.5小時視乎
粉漿厚度. 如用明火蒸, 大火滾
起後, 用中大火蒸. 注意⚠️不要
太猛火否則容易會有洞在年糕面
蒸完加一粒紅棗在中間, 完成!
肥媽 Maria Cordero
YouTube Live – January 26, 2021 Recipe English Version
Simplified Coconut Chinese New Year Cake (“Nian Gao”)
Flour Ingredients:
Glutinous rice flour - 225g
Wheat starch (“Teng Mein”) - 30g (or replace with cornflour)
Rice flour - 37g
These flours combination will not give you a sticky and hard texture. It will be soft, bouncy, and chewy the next day instead of hard and sticky.
If you wish the make the traditional version, just omit the wheat starch (“Teng Mein”) and rice flour from the recipe and the rest remain the same.
Sweetener ingredient:
Chinese dark brown sugar - 200g or about 2 slabs (break into small pieces so they melt faster)
Liquid ingredients:
Water - 210g
Coconut milk - 120g (for more intense coconut flavor you can use coconut cream)
Oil - 30g or about 2 ½ tbsp
Garnish ingredient:
Chinese red date
Other utensils:
Sifter
Spatula
Whisk
Stand mixer – optional
Balloon whisk - optional
Oiled steam proof pan for steaming
Toothpick
Foil paper or plate to cover the pan
Methods:
1. In a large mixing bowl, you MUST SIFT the glutinous flour, rice flour, wheat starch (“Teng Mein”) into the bowl and mix well. Make a hole in the center. Set aside. This is your flour mixture.
2. In a cooking pot, add in Chinese dark brown sugar pieces, water, and turn on LOW heat to melt the sugar. DO NOT use high heat because it will evaporate the water.
3. Once it starts to boil, TURN OFF the heat and keep stirring to speed up the melting process.
4. Pour the melted sugar through a sifter into a large bowl to make sure there are no hard lumps of sugar left and MUST let it stand to cool to room temperature before mixing with other ingredients. Keep stirring to speed up the cooling process.
5. Once it is almost cool, add in the coconut milk. Mix well. This is your liquid mixture.
6. Add ONLY about ¼ of a cup of the liquid mixture into the well of the flour mixture prepared in Step 1.
7. Mix well with a spatula until all the liquid is absorbed into the flour. Continue with the rest of the liquid mixture by adding about ¼ cup at a time into the flour mixture and mix well before adding the next ¼ cup of liquid mixture. Be patience. **DO NOT add all the liquid into the flour at once.**
8. Once all liquid mixture has been mixed in with the flour, give a final good mix with a whisk and making sure there is no dry flour left.
9. Add the oil and continue mixing with a whisk until the oil is well incorporated into the batter or you can use an electric stand mixer, attached with a balloon whisk, and mix until you get a smooth batter about 1 minute or so on low speed.
10. Leave the batter in the mixing bowl and let it sit and rest for about 20 minutes. This step is VERY IMPORTANT to let the flour absorbs all the liquid and moisture for even flavor and a better tasting cake. This step also replaces the traditional way of laborious kneading of the batter.
11. Preheat the steam oven to 100C (212F).
12. After 20 minutes, mix the batter again with a spatula because flour will fall to the bottom of the bowl again after a waiting period.
13. You MUST SIFT the batter again into a bowl. This will make sure you get a smooth cake after.
14. Pour the batter into an oiled steam proof pan. Flatten any bubbles on the top surface with a toothpick. Cover the pan with a foil paper or plate to prevent condensation drippings.
15. Steam for 1 hour to 1 ½ hour depending on the thickness of your batter in the pan. Prefer to over steam instead of under steam.
DO NOT steam on high heat to prevent bubbles formed on the top surface of your cake when done.
16. The cake is done when you stick a bamboo stick into the center of the cake and comes out clean.
17. Garnish with a red date by placing it in the center of the cake.

#中英文食譜來了
#我最愛的布朗尼
再撐一下下終於要下班, 再兩天就是快樂的周末😍😍
週末來做再怎麼手殘都能做出來的超好吃布朗尼吧!!!
我最愛的布朗尼圖文食譜收集在我的部落格 [莉雅幸福廚房] https://bit.ly/3of5l5Z (還有更多更棒食譜都在這, 訂閱一下部落格吧!不定期上傳新食譜]
對於癡迷巧克力的我來說,即使是做最普通常見的布朗尼,我都會要求用好品質的巧克力塊,而不是巧克力粉.巧克力粉做出來的布朗尼有巧克力味,但卻沒有巧克力塊做出來的濃郁口感
我覺得最好吃的布朗尼就是表面是脆的,上層是輕的,下層是濃郁濕潤又扎實的巧克力塊.而不是輕柔的巧克力海綿蛋糕假裝是布朗尼
要做出這樣的布朗尼
1. 好的黑巧克力 dark chocolate 不建議用牛奶巧克力
2. 要蜂蜜代替部份糖類,因為蜂蜜會增加保濕
3. 加一些些即溶黑咖啡,咖啡跟巧克力非常合,它會幫助帶出巧克力的味道
I am a big fan of chocolate and very strict about its quality. Even with the most common baked products, such as brownies, I believe in only using the finest quality cacao.
Brownies should always be moist and very dense, with at least two layers. The top part should be dry but the bottom part should be moist. Because real chocolate is very heavy, it always settles to the bottom while baking.
The key to making fantastic brownies:
1. Using the best quality dark chocolate available.
2. Whisk the batter in moderately. Brownies do not contain as much air as cakes do. This is why we don’t use baking soda or powder in brownies.
3. Use honey as a substitution for sugar. Honey contributes to the moisture content of the brownies.
4. Another option is to add a dash of instant coffee. It pairs very well with chocolate. You won’t actually taste coffee but it helps to strengthen the taste of chocolate.
Ingredients
· 150 g dark chocolate,chopped 黑巧克力
· 60 g butter 奶油
· 75 g eggs 蛋
· 40 g brown sugar 黃糖
· 30g honey 蜂蜜
· 50 g plain flour 低筋麵粉
· 1/4 tbsp vanilla extract 香草精
· 15 ml instant coffee 即溶黑咖啡
Method
1. 預熱烤箱180度
2. 用微波爐溶化巧克力和奶油(不要過度加熱,兩者可一起溶化,稍微放涼)
3. 將蛋,糖,蜂蜜,香草精一起攪拌(糖溶解就好,不要過度攪拌,布朗尼不需要太多空氣)
4. 加入溶化巧克力,即溶黑咖啡和奶油扮勻
5. 加入過篩的麵粉拌至看不見粉就好
6. 烤20-30分鐘,中間用叉子插一下叉子是乾淨的就好了
1. Preheat the oven to 180C
2. Melt the chocolate and butter together in a microwave. Allow to cool slightly.
3. Whisk together the eggs, sugar, honey, instant coffee and vanilla
4. Pour in the chocolate mixture and sift in the flour.
5. Stir gently and thoroughly until combined
6. Bake for about 20-30 minutes until you can run a knife through the center and comes out dry.
#莉雅老師 #輔大英美文學碩士 #誤入烘焙業的英文老師 #巴黎藍帶主廚 #中英文廚藝教學 #雙面世界金牌冠軍 #暢銷食譜書作家 #廚藝界網美

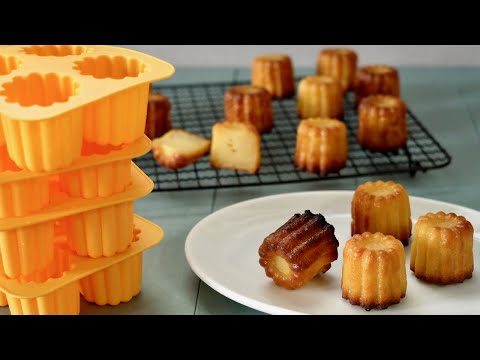
カヌレの型は、ずっと欲しかったけどけっこうお高い。いつもこの動画で使ったクグロフ型を使ってカヌレを作って楽しんでいました。( https://youtu.be/JqCU6YOvdCo )
そんな時に知った100円ショップの情報。たった100円でカヌレの型が買えるなんて!夢みたい!とセリアのシリコーンモールド カヌレ型をずっと探していました。そして、この度、やっとやっと入手することができました!
ずいぶん長いこと探していたセリアのシリコーンモールド カヌレ型だったので、迷いなく4個を即買い。
しかしここで問題が発生。家に帰ってパッケージの裏を見てみたら、そこには衝撃の事実が!
なんと『耐熱温度以下であっても20分以内で使用してください』との説明書き。カヌレって1時間連続加熱がほぼ常識。これどうすりゃいいのよ!と考えて、苦肉の方法で焼成しています。焼き、腰折れ、色々と改善の余地ありなのですが、材料は16個分ぴったりの卵液量で、しかも卵黄1個で作れるように調整しました。焼き菓子と蝉の声のアンバランスもお楽しみください。
*レシピ*(3.5 ✕ H3.5センチのミニカヌレ16個/400ml分)
薄力粉:70g
Mサイズの卵の卵黄:1個分
グラニュー糖:115g
牛乳:250g
ラム酒:10g
バニラオイル:3振り
無塩バター(型に塗る用):適量
1.薄力粉 70gをフルっておく。
2.ボウルに卵黄 1個分(Mサイズの卵の卵黄 20g)を溶く。
3.グラニュー糖 115gを入れ混ぜる。
4.60℃に温めた牛乳 250gを(3)に少し加え混ぜる。
5.(1)を加え混ぜる。混ぜすぎないこと。
6.(4)の残りの牛乳を加え混ぜる。
7.ラム酒 10gとバニラオイル 3振り加え混ぜる。
8.アミで濾す。
9.冷蔵庫で12〜24時間休ませる。
10.卵液を冷蔵庫から出し、1時間ほどおき、常温にしておく。
11.カヌレ型に無塩バターをちょっと多めに塗り、冷蔵庫に入れておく。
12.オーブンは220℃にしっかり予熱しておく。
13.(10)の常温にした卵液を静かに底から混ぜる。
14.(11)の型に流し入れる。
15.220℃に予熱したオーブンで20分焼く。
16.一旦取り出し3分待つ。
17.再び、220℃に予熱しておいたオーブンに入れ、170℃に変更し20分焼く。
18.再び、一旦取り出し3分待つ。
19.再び、170℃に予熱したオーブンで20分焼く。
20.オーブンから取り出し、型のまま10分おく。
21.網に取り出す。
22.でけた。
オーブン温度を
220℃を230℃に 170℃を180℃に上げ、もっとカリカリに焼けるように再挑戦したいです。
改善の余地ありだけど、家族がおいしいと言ってくれたからよし。しかし、このカヌレ型かわいい。ゼリーやチョコレートにも使いたいわ。
#Seria #カヌレ型 #カヌレ #作り方
I've always wanted a canelé mold, but they are quite expensive. I always enjoyed making cannulae using the kouglof mold used in this video. ( https://youtu.be/JqCU6YOvdCo )
That's when I learned about a 100 yen shop information. How can you buy a canelé mold for only 100 yen? It's like a dream! I've been looking for the Seria Silicone Canele molds for a long time. And now I've finally, finally got one!
I've been looking for these molds for a long time, so I bought 4 of them right away without hesitation.
But here's the problem. When I got home and looked at the back of the package, I found a shocking fact! It said, "Please use within 20 minutes even if the temperature is below the heat resistant temperature." It's almost common knowledge that canelés should be heated continuously for an hour. I thought to myself, "What am I supposed to do?"
Thinking that, somehow I managed to bake it.
There is a lot of room for improvement in the baking process, but I have adjusted the ingredients so that I can make 16 canelés with exactly the right amount of egg liquid, and only one egg yolk.
Please enjoy the imbalance between the baked goods and the cicadas' voices.
* Recipe * (3.5 ✕ H3.5 cm mini canelés 16 pieces / 400 ml)
Cake flour: 70g
Egg yolk of M size egg: 1
Granulated sugar: 115g
Milk: 250g
Rum: 10g
Vanilla oil: 3 shakes
Unsalted butter (for applying to mold): Appropriate amount
1.Sift 70g of cake flour.
2.In a bowl, beat the yolk of one egg (20g of yolk from a medium egg).
3.Mix in 115g of granulated sugar.
4.Add a little from 250g of warmed milk (60℃) to (3) and mix.
5.Add (1) and mix. Do not mix too much.
6.Add the remaining milk from (4) and mix.
7.Add 10g of rum and 3 shakes of vanilla oil.
8.Strain through a mesh.
9.Let it rest in the refrigerator for 12 to 24 hours.
10.Remove the egg mixture from the refrigerator and allow it to come to room temperature for about an hour.
11.Grease a canelé mold with a little more unsalted butter and put it in the refrigerator.
12.Preheat the oven to 220℃.
13.Gently mix the egg liquid at room temperature in (10) from the bottom.
14.Pour the mixture into the mold of (11).
15.Bake in a preheated oven at 220℃ for 20 minutes.
16.Take it out and wait 3 minutes.
17.Place in the preheated oven again at 220℃, change the temperature to 170℃, and bake for 20 minutes.
18.Take it out again and wait for 3 minutes.
19.Bake again in a preheated oven at 170℃ for 20 minutes.
20.Remove from the oven and leave the mold for 10 minutes.
21.Take it out to the net.
22.It's done.
I'd like to try again to raise the oven temperature from 220°C to 230°C and from 170°C to 180°C, so that it bakes more crispy. There's room for improvement, but my family said it was delicious, so that's good. By the way, these cannelé molds are cute. I want to use them for jelly and chocolate.

バターときなこがとても香り良く、お口の中でほろっと
崩れるバターケーキです。
しっとりと濃厚です。
ポイントはバターをふわふわに立てることと、室温に戻した卵を分離させずに混ぜること!
絶品です、ぜひ作って味わってみてください^^
レシピは下にあります↓
フォロー&いいね! も お願いします!!!!!!
twitter
https://twitter.com/cookkafemaru
instagram
https://www.instagram.com/kafemaru/?hl=ja
==================================================
最新刊も発売中~本屋さんで見てもらえると嬉しいです!
みんなぜひぜひ買ってねーーーー!!!
大人気YouTuber “cook kafemaru”の
「罪深いスイーツ」
Amazonはこちらから購入できます↓↓↓
https://www.amazon.co.jp//dp/4046048948/
==================================================
「世界一作りやすいおうちスイーツ 」
もおかげ様で10刷になりました。
どうもありがとうございます。
Amazonで購入できます。↓↓↓
https://www.amazon.co.jp/dp/4046045116/
もしもお住いの近くの本屋さんになかったら、セブンイレブンの
オムニ7でネット予約し、セブンイレブン店頭受け取りで買うことができます!
=============================================
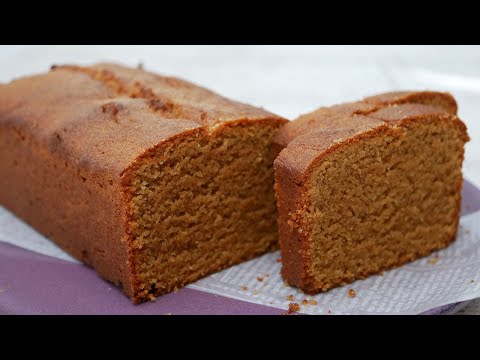
【Ingredients】7in(18cm)×3in(8cm)loaf pan
100g Unsalted butter
cut into small pieces, softened at room temperature
80g Cane sugar (or Granulated sugar)
90g Whole egg 全卵 90g
must be at room temperature
●60g Kinako (roasted soybean flour)
●40g Almond flour
●2g Baking powder
【Directions】
Preparation: Beat the egg well.
*Please bring the eggs to room temperature before using them If they are still cold, they will make the butter cold, and make the mixture separate easily.
Line the cake pan with parchment paper.
Preheat the oven to 356 °F/180℃
①Beat butter and granulated sugar until light and fluffy.
②Beat the eggs, and add it little by little.
③Add the ingredients marked with ● to a bowl and mix well with a spatula.
Don't forget to sift them
④Pour the batter into a loaf pan and smooth the surface.
⑤Pour the batter into a paper-lined loaf pan , and bake at 180°C for about 32 minutes.
Let the middle sink when you are pouring the batter into the tin.
When it has been in the oven for 10 minutes, make a vertical slit down the middle.
Insert a bamboo skewer and when it comes out clean, it's done.
*If it seems like it might burn halfway through, cover with aluminium foil and continue baking.
*Let it cool, and cover with plastic wrap.
【材料】18cm×8cm×H6cm パウンド型 1台分
無塩バター 100g
きび砂糖(or グラニュー糖) 80g
全卵 90g
●きな粉 60g
●アーモンドプードル 40g
●ベーキングパウダー 2g
【作り方】
準備:
卵とバターは室温にする。
卵は溶いて、90g量る。
型にクッキングシートを敷いておく。
オーブンは180度に予熱する。
①バターに砂糖を加えて白っぽくふんわりするまで泡立て器で混ぜる。
***HMをお持ちでしたらお使いください、手早くふんわりします。
②溶き卵を数回に分けて加える。
****卵は室温に戻すのを忘れずに。冷えたまま使うと、バターが冷えて分離しやすくなります。もしも忘れていたら、溶き卵をボウルに入れてボウルの底を湯煎に数秒つけてを何度か繰り返し、室温に戻します。温めすぎると今度はバターが溶け出すので注意します。
③●の材料をふるい入れ、ゴムベラでよく混ぜる。
④型に入れて表面をならし、両サイドを高く、中央を低くするように生地入れをする。
***こうすることで火が入りやすくなります。
⑤180℃に温めたオーブンで32分焼く。
***焼き始めてから10分ほど経ったところでナイフで中央に切り込みを入れると焼き上がりが縦に綺麗に割れます。
中央に竹串を刺してみて何もつかなければ焼き上がり!
*途中で焦げてしまいそうなときは、アルミホイルをかぶせて焼いてください。
*粗熱をとり、ラップに包んでおくとしっとりします。
************************
保存方法
●焼いた当日は粗熱が取れたらラップにくるむかビニール袋に入れる。
(完全にそのまま冷ますよりもこの方がしっとりします)
●●冬の時期は暖房のない部屋で3-4日は美味しく食べることが出来ます。
●夏場は冷蔵庫の野菜室で4日ほど保存可能、それ以上は冷凍しましょう。
ただし冷えるとバター生地なので生地がしまって固くなるため、食べる時は室温に戻して食べます。
ただし手作りのお菓子は保存剤や防腐剤などが入らないので市販の物とは違います。その点十分にご留意ください。
●プレゼントで誰かに送りたいときは、宅急便はクール(冷蔵)便で。
夏も冬もこの方が安心して送ることが出来ます。
食べる時に室温に戻します。
●ラッピングは翌日に食べるならOPP袋に入れて。
また、脱酸素剤をガス袋の中に入れシーラーで留めれば、酸化を防いでくれるのでより美味しさをキープ出来ます。

I made a layer crepe cake ( mille crêpes ) with a wavy way of sandwiching the cream.During the process, I lost about five crepes unexpectedly, and it turned out to be far from mille.I'm sure the visual is not enough, but please enjoy.
*Recipe*.
Bake the crepes (makes about 13 crepes)
1.Sift 60g of cake flour, 15g of cocoa powder and 5g of baking powder together.
2.Beat 2 eggs.
3.Add 15g of sugar and a pinch of salt and mix.
4.Add about 25% of 200ml of milk and mix.
5.Add (1) and mix so as not to get lumpy.
6.Add the remaining milk from (4) and mix. If you are worried about lumps, strain the mixture through a mesh.
Bake in a frying pan for Tamagoyaki.
7.Heat a frying pan and add a thin layer of oil.
8.Pour in the dough for a small ladle and spread.
9.When the edges start to brown and dry out, turn the dough over.
10.Take it out after baking a little. Repeat a series of work.
11.Layer the crepe dough, wrap it in plastic wrap, and cool it in the refrigerator.
12.Add 30g of sugar to 350g of fresh cream and whip.
13.Put (12) between (11) and stack them.
14.Wrap it in plastic wrap and cool it in the refrigerator.
15.Cut off the 4 sides with a warm knife.
16.Done.
クリームのはさみ方を波なみにしたミルクレープ作りました。途中、クレープを5枚ほど、思わぬところで失ってしまい、ミル?には程遠い感じになってしまいました。物足りないビジュアルとは思いますが、ご容赦願います。
*レシピ*
クレープを焼きます(13枚ほど焼けます)
1.薄力粉 60g、ココアパウダー 15g、ベーキングパウダー 5gの粉類を合わせてふるいます。
2.卵 2個をときほぐす。
3.砂糖 15g、塩 ひとつまみを入れ混ぜる。
4.牛乳 200mlのうち、1/4ほどを入れ混ぜる。
5.(1)を入れ、ダマにならないように混ぜる。
6.(4)の残りの牛乳を入れ混ぜる。ダマが気になるときは網でこす。
7.卵焼き用のフライパンで焼きます。
フライパンを熱し、油を薄くひく。
8.小さなお玉 1杯分の生地を流し入れ、広げる。
9.縁が焼け、乾いてきたら、ひっくり返す。
10.少し焼いたら取り出す。一連の作業を繰り返す。
11.クレープ生地を重ねてラップに包み、冷蔵庫で冷やす。
12.生クリーム 350gに砂糖 30gを入れホイップする。
13.(11)の間に(12)を挟み、重ねていく。
14.ラップに包み冷蔵庫で冷やす。
15.温めたナイフで4辺を切り落とす。
16.でけた。
#CrepeCake #MilleCrêpes #recipes #ミルクレープ #クレープケーキ #レシピ

sift through 在 How do I make my porgram sift through a users input (using ... 的推薦與評價
... <看更多>